
This is the fourth post in a series all about uploading files for the web. In the previous posts, we covered uploading files using just HTML, uploading files using JavaScript, and how to receive file uploads on a Node.js server.
- Upload files with HTML
- Upload files with JavaScript
- Receive uploads in Node.js (Nuxt.js)
- Optimize storage costs with Object Storage
- Optimize performance with a CDN
- Upload security & malware protection
This post is going to take a step back and explore architectural changes to reduce costs when adding file uploads to our applications.

By this point, we should be receiving multipart/form-data in Node.js, parsing the request, capturing the file, and writing that file to the disk on the application server.
There are a couple of issues with this approach.
First, this approach doesn’t work for distributed systems that rely on several different machines. If a user uploads a file it can be hard (or impossible) to know which machine received the request, and therefore, where the file is saved. This is especially true if you’re using serverless or edge compute.
Secondly, storing uploads on the application server can cause the server to quickly run out of disk space. At which point, we’d have to upgrade our server. That could be much more expensive than other cost-effective solutions.
And that’s where Object Storage comes in.
What is Object Storage
You can think of Object Storage like a folder on a computer. You can put any files (aka “objects”) you want in it, but the folders (aka “buckets”) live within a cloud service provider. You can also access files via URL.
Object Storage provides a couple of benefits:
- It’s a single, central place to store and access all of your uploads.
- It’s designed to be highly available, easily scalable, and super cost-effective.
For example, if you consider shared CPU servers, you could run an application for $5/month and get 25 GB of disk space. If your server starts running out of space, you could upgrade your server to get an additional 25 GB, but that’s going to cost you $7/month more.
Alternatively, you could put that money towards Object Storage and you would get 250 GB for $5/month. So 10 times more storage space for less cost.
Of course, there are other reasons to upgrade your application server. You may need more RAM or CPU, but if we’re talking purely about disk space, Object Storage is a much cheaper solution.
With that in mind, the rest of this article will cover connecting an existing Node.js application to an Object Storage provider. We’ll use formidable to parse multipart requests, but configure it to upload files to Object Storage instead of writing to disk.
If you want to follow along, you will need to have an Object Storage bucket set up, as well as the access keys. Any S3-compatible Object Storage provider should work. Today, I’ll be using (formerly Linode). If you want to do the same, here’s a guide that shows you how to get going: https://www.linode.com/docs/products/storage/object-storage/get-started/
.
What is S3
Before we start writing code, there’s one more concept that I should explain, S3. S3 stands for “Simple Storage Service”, and it’s an Object Storage product originally developed at AWS.
Along with their product, AWS came up with a standard communication protocol for interacting with their Object Storage solution.
As more companies started offering Object Storage services, they decided to also adopt the same S3 communication protocol for their Object Storage service, and S3 became a standard.
As a result, we have more options to choose from for Object Storage providers and fewer options to dig through for tooling. We can use the same libraries (maintained by AWS) with other providers. That’s great news because it means the code we write today should work across any S3-compatible service.
The libraries we’ll use today are @aws-sdk/client-s3 and @aws-sdk/lib-storage:
npm install @aws-sdk/client-s3 @aws-sdk/lib-storage
These libraries will help us upload objects into our buckets.
Okay, let’s write some code!
Start with existing Node.js application
We’ll start with an example Nuxt.js event handler that writes files to disk using formidable. It checks if a request contains multipart/form-data and if so, it passes the underlying Node.js request object (aka IncomingMessage) to a custom function parseMultipartNodeRequest. Since this function uses the Node.js request, it will work in any Node.js environment and tools like formidable.
import formidable from 'formidable';

/* global defineEventHandler, getRequestHeaders, readBody */

/**
 * @see https://nuxt.com/docs/guide/concepts/server-engine
 * @see https://github.com/unjs/h3
 */
export default defineEventHandler(async (event) => {
  let body;
  const headers = getRequestHeaders(event);

  if (headers['content-type']?.includes('multipart/form-data')) {
    body = await parseMultipartNodeRequest(event.node.req);
  } else {
    body = await readBody(event);
  }
  console.log(body);

  return { ok: true };
});

/**
 * @param {import('http').IncomingMessage} req
 */
function parseMultipartNodeRequest(req) {
  return new Promise((resolve, reject) => {
    const form = formidable({ multiples: true });
    form.parse(req, (error, fields, files) => {
      if (error) {
        reject(error);
        return;
      }
      resolve({ ...fields, ...files });
    });
  });
}
We’re going to modify this code to send the files to an S3 bucket instead of writing them to disk.
Set up S3 Client
The first thing we need to do is set up an S3 Client to make the upload requests for us, so we don’t have to write them manually. We’ll import the S3Client constructor from @aws-sdk/client-s3 as well as the Upload command from @aws-sdk/lib-storage. We’ll also import Node’s stream module to use later on.
import stream from 'node:stream';
import { S3Client } from '@aws-sdk/client-s3';
import { Upload } from '@aws-sdk/lib-storage';
Next, we need to configure our client using our S3 bucket endpoint, access key, secret access key, and region. Again, you should already have set up an S3 bucket and know where to find this information. If not, check out this guide ().
I like to store this information in environment variables and not hard-code the configuration into the source code. We can access those variables using process.env to use in our application.
const { S3_URL, S3_ACCESS_KEY, S3_SECRET_KEY, S3_REGION } = process.env;
If you’ve never used environment variables, they’re a good place for us to put secret information such as access credentials. You can read more about them here: https://nodejs.dev/en/learn/how-to-read-environment-variables-from-nodejs/
With our variables set up, I can now instantiate the S3 Client we’ll use to communicate to our bucket.
const s3Client = new S3Client({
  endpoint: `https://${S3_URL}`,
  credentials: {
    accessKeyId: S3_ACCESS_KEY,
    secretAccessKey: S3_SECRET_KEY,
  },
  region: S3_REGION,
});
It’s worth pointing out that the endpoint needs to include the HTTPS protocol. In Akamai’s Object Storage dashboard, when you copy the bucket URL, but it doesn’t include the protocol (bucket-name.bucket-region.linodeobjects.com). So I just add the prefix here.
With our S3 client configured, we can start using it.
Modify formidable
In our application, we’re passing any multipart Node request into our custom function, parseMultipartNodeRequest. This function returns a Promise and passes the request to formidable, which parses the request, writes files to the disk, and resolves the promise with the form fields data and files data.
function parseMultipartNodeRequest(req) {
  return new Promise((resolve, reject) => {
    const form = formidable({ multiples: true });
    form.parse(req, (error, fields, files) => {
      if (error) {
        reject(error);
        return;
      }
      resolve({ ...fields, ...files });
    });
  });
}
This is the part that needs to change. Instead of processing the request and writing files to disk, we want to pipe file streams to an S3 upload request. So as each file chunk is received, it’s passed through our handler to the S3 upload.
We’ll still return a promise and use formidable to parse the form, but we have to change formidable’s configuration options. We’ll set the fileWriteStreamHandler option to a function called fileWriteStreamHandler that we’ll write shortly.
/** @param {import('formidable').File} file */
function fileWriteStreamHandler(file) {
  // TODO
}
const form = formidable({
  multiples: true,
  fileWriteStreamHandler: fileWriteStreamHandler,
});
Here’s what their documentation says about fileWriteStreamHandler:
options.fileWriteStreamHandler{function} – defaultnull, which by default writes to host machine file system every file parsed; The function should return an instance of a Writable stream that will receive the uploaded file data. With this option, you can have any custom behavior regarding where the uploaded file data will be streamed for. If you are looking to write the file uploaded in other types of cloud storages (AWS S3, Azure blob storage, Google cloud storage) or private file storage, this is the option you’re looking for. When this option is defined the default behavior of writing the file in the host machine file system is lost.
As formidable parses each chunk of data from the request, it will pipe that chunk into the Writable stream that’s returned from this function. So our fileWriteStreamHandler function is where the magic happens.
Before we write the code, let’s understand some things:
- This function must return a Writable stream to write each upload chunk to.
- It also needs to pipe each chunk of data to an S3 Object Storage.
- We can use the
Uploadcommand from@aws-sdk/lib-storageto create the request. - The request body can be a stream, but it must be a Readable stream, not a Writable stream.
- A Passthrough stream can be used as both a Readable and Writable stream.
- Each request formidable will parse may contain multiple files, so we may need to track multiple S3 upload requests.
fileWriteStreamHandlerreceives one parameter of typeformidable.Fileinterface with properties likeoriginalFilename,size,mimetype, and more.
OK, now let’s write the code. We’ll start with an Array to store and track all the S3 upload request outside the scope of fileWriteStreamHandler. Inside fileWriteStreamHandler, we’ll create the Passthrough stream that will serve as both the Readable body of the S3 upload and the Writable return value of this function. We’ll create the Upload request using the S3 libraries, and tell it our bucket name, the object key (which can include folders), the object Content-Type, the Access Control Level for this object, and the Passthrough stream as the request body. We’ll instantiate the request using Upload.done() and add the returned Promise to our tracking Array. We might want to add the response Location property to the file object when the upload completes, so we can use that information later on. Lastly, we’ll return the Passthrough stream from this function:
/** @type {Promise<any>[]} */
const s3Uploads = [];

/** @param {import('formidable').File} file */
function fileWriteStreamHandler(file) {
  const body = new stream.PassThrough();
  const upload = new Upload({
    client: s3Client,
    params: {
      Bucket: 'austins-bucket',
      Key: `files/${file.originalFilename}`,
      ContentType: file.mimetype,
      ACL: 'public-read',
      Body: body,
    },
  });
  const uploadRequest = upload.done().then((response) => {
    file.location = response.Location;
  });
  s3Uploads.push(uploadRequest);
  return body;
}
A couple of things to note:
Keyis the name and location the object will exist. It can include folders that will be created if they do not currently exist. If a file exists with the same name and location, it will be overwritten (fine for me today). You can avoid collisions by using hashed names or timestamps.ContentTypeis not required, but it’s helpful to include. It allows browsers to create the downloaded response appropriately based on Content-Type.ACL: is also optional, but by default, every object is private. If you want people to be able to access the files via URL (like an<img>element), you’ll want to make it public.- Although
@aws-sdk/client-s3supports uploads, you need@aws-sdk/lib-storageto support Readable streams. - You can read more about the parameters on NPM: https://www.npmjs.com/package/@aws-sdk/client-s3
This way, formidable becomes the plumbing that connects the incoming client request to the S3 upload request.
Now there’s just one more change to make. We are keeping track of all the upload requests, but we aren’t waiting for them to finish.
We can fix that by modifying the parseMultipartNodeRequest function. It should continue to use formidable to parse the client request, but instead of resolving the promise immediately, we can use Promise.all to wait until all the upload requests have resolved.
The whole function looks like this:
/**
 * @param {import('http').IncomingMessage} req
 */
function parseMultipartNodeRequest(req) {
  return new Promise((resolve, reject) => {
    /** @type {Promise<any>[]} */
    const s3Uploads = [];

    /** @param {import('formidable').File} file */
    function fileWriteStreamHandler(file) {
      const body = new PassThrough();
      const upload = new Upload({
        client: s3Client,
        params: {
          Bucket: 'austins-bucket',
          Key: `files/${file.originalFilename}`,
          ContentType: file.mimetype,
          ACL: 'public-read',
          Body: body,
        },
      });
      const uploadRequest = upload.done().then((response) => {
        file.location = response.Location;
      });
      s3Uploads.push(uploadRequest);
      return body;
    }
    const form = formidable({
      multiples: true,
      fileWriteStreamHandler: fileWriteStreamHandler,
    });
    form.parse(req, (error, fields, files) => {
      if (error) {
        reject(error);
        return;
      }
      Promise.all(s3Uploads)
        .then(() => {
          resolve({ ...fields, ...files });
        })
        .catch(reject);
    });
  });
}
The resolved files value will also contain the location property we included, pointing to the Object Storage URL.
Walk through the whole flow
We covered a lot, and I think it’s a good idea to review how everything works together. If we look back at the original event handler, we can see that any multipart/form-data request will be received and passed to our parseMultipartNodeRequest function. The resolved value from this function will be logged to the console:
export default defineEventHandler(async (event) => {
  let body;
  const headers = getRequestHeaders(event);

  if (headers['content-type']?.includes('multipart/form-data')) {
    body = await parseMultipartNodeRequest(event.node.req);
  } else {
    body = await readBody(event);
  }
  console.log(body);

  return { ok: true };
});
With that in mind, let’s break down what happens if I want to upload a cute photo of Nugget making a big ol’ yawn.
- For the browser to send the file as binary data, it needs to make a
multiplart/form-datarequest with an HTML form or with JavaScript. - Our Nuxt.js application receives the
multipart/form-dataand passes the underlying Node.js request object to our customparseMultipartNodeRequestfunction. parseMultipartNodeRequestreturns aPromisethat will eventually be resolved with the data. Inside thatPromise, we instantiate the formidable library and pass the request object to formidable for parsing.- As formidable is parsing the request when it comes across a file, it writes the chunks of data from the file stream to the
Passthroughstream that’s returned from thefileWriteStreamHandlerfunction. - Inside the
fileWriteStreamHandlerwe also set up a request to upload the file to our S3-compatible bucket, and we use the samePassthroughstream as the body of the request. So as formidable writes chunks of file data to thePassthroughstream, they are also read by the S3 upload request. - Once formidable has finished parsing the request, all the chunks of data from the file streams are taken care of, and we wait for the list of S3 requests to finish uploading.
- After all that is done, we resolve the
PromisefromparseMultipartNodeRequestwith the modified data from formidable. Thebodyvariable is assigned to the resolved value. - The data representing the fields and files (not the files themselves) are logged to the console.
So now, if our original upload request contained a single field called “file1” with the photo of Nugget, we might see something like this:
{
  file1: {
    _events: [Object: null prototype] { error: [Function (anonymous)] },
    _eventsCount: 1,
    _maxListeners: undefined,
    lastModifiedDate: null,
    filepath: '/tmp/93374f13c6cab7a01f7cb5100',
    newFilename: '93374f13c6cab7a01f7cb5100',
    originalFilename: 'nugget.jpg',
    mimetype: 'image/jpeg',
    hashAlgorithm: false,
    createFileWriteStream: [Function: fileWriteStreamHandler],
    size: 82298,
    _writeStream: PassThrough {
      _readableState: [ReadableState],
      _events: [Object: null prototype],
      _eventsCount: 6,
      _maxListeners: undefined,
      _writableState: [WritableState],
      allowHalfOpen: true,
      [Symbol(kCapture)]: false,
      [Symbol(kCallback)]: null
    },
    hash: null,
    location: 'https://austins-bucket.us-southeast-1.linodeobjects.com/files/nugget.jpg',
    [Symbol(kCapture)]: false
  }
}
It looks very similar to the object formidable returns when it writes directly to disk, but this time it has an extra property, location, which is the Object Storage URL for our uploaded file.
Throw that sucker in your browser and what do you get?
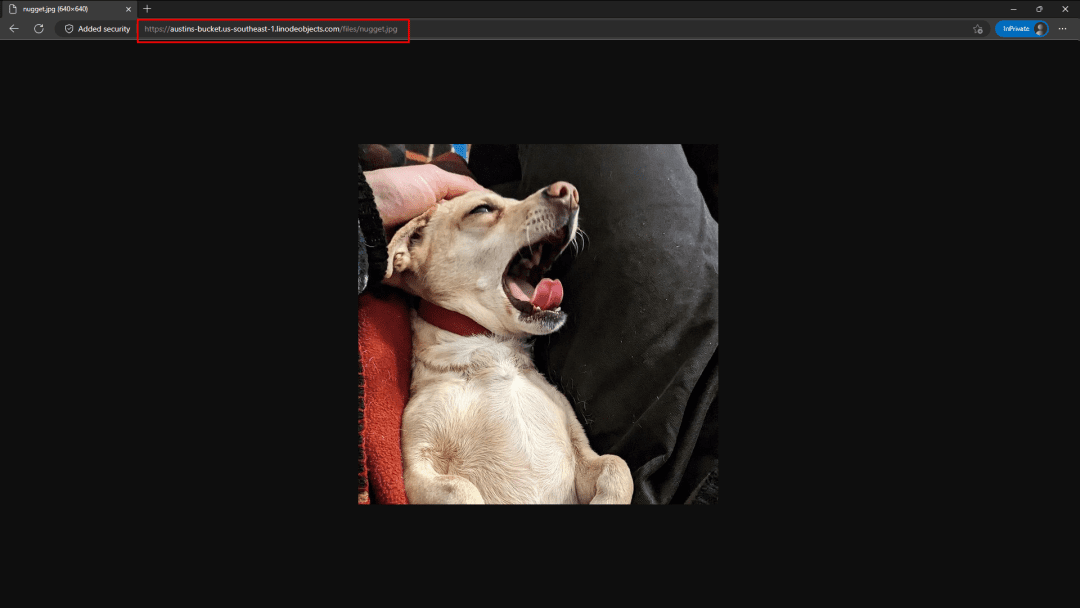
That’s right! A cute photo of Nugget making a big ol’ yawn 🥰
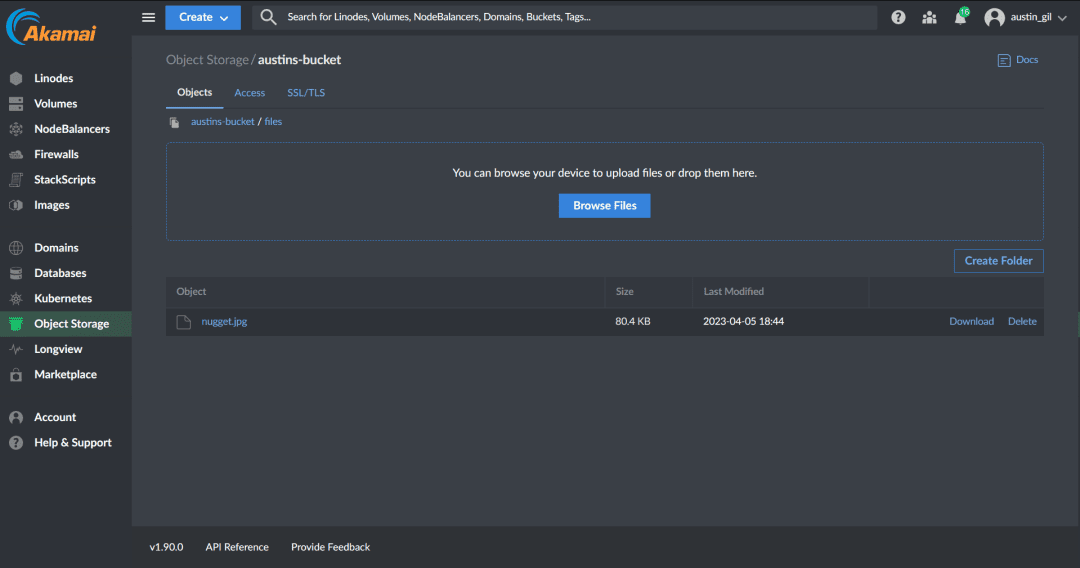
I can also go to my bucket in my Object Storage dashboard and see that I now have a folder called “files” containing a file called “nugget.jpg”.
Caveats
I would be remiss if I didn’t mention the following. (In fact, I was remiss because I didn’t mention it until after someone pointed it out in the comments 🤣)
Streaming uploads through your backend to Object Storage is not the only way to upload files to S3. You can also use signed URLs. Signed URLs are basically the same URL in the bucket where the file will live, but they include an authentication signature that can be used by anyone to upload a file, as long as the signature has not expired (usually quite soon).
Here’s how the flow generally works:
- Frontend makes a request to the backend for a signed URL.
- Backend makes an authenticated request to the Object Storage provider for a signed URL with a given expiry.
- Object Storage provider provides a signed URL to the backend.
- Backend returns the signed URL to the frontend.
- Frontend uploads the file directly to Object Storage thanks to the signed URL.
- Optional: Frontend may make another request to the Backend if you need to update a database that the upload completed.
This flow requires a little more choreography than Frontend -> Backend -> Object Storage, but it has some benefits.
- It moves work off your servers, which can reduce load and improve performance.
- It moves the file upload bandwidth off your server. If you pay for ingress and have several large file uploads all the time, this could add up.
It also comes with its own costs.
- You have much less control over what users can upload. This might include malware.
- If you need to perform functions on the files like optimizing, you can’t do that with signed URLs.
- The complex flow makes it much harder to build an upload flow with progressive enhancement in mind.
As with most things in web development, there is not one right solution. It will largely depend on your use case. I like going through my backend, so I have more control over the files and I can simplify the frontend.
I wanted to share this streaming option, largely because there is hardly any content out there about streaming. Most content uses signed URLs (maybe I’m missing something). If you’d like to learn more about using signed URLs, here is some documentation and here’s a handy tutorial by Mary Gathoni.
Closing thoughts
Okay, we covered a lot today. I hope it all made sense. If not, feel free to reach out to me with questions. Also, reach out and let me know if you got it working in your own application.
I’d love to hear from you because using Object Storage is an excellent architectural decision if you need a single, cost-effective place to store files.
In the next posts, we’ll work on making our applications deliver files faster, as well as protecting our applications from malicious uploads.
- Upload files with HTML
- Upload files with JavaScript
- Receive uploads in Node.js (Nuxt.js)
- Optimize storage costs with Object Storage
- Optimize performance with a CDN
- Upload security & malware protection
I hope you stick around.
Thanks for stopping by my corner of the internet. Here, there are no ads, trackers, paywalls, accounts, etc. It's hard, but worth the better experience. If you'd like to keep this site up, consider hiring me, making a donation, buying something (soon), leaving a comment, or sharing. It helps more than you know. I'm glad you're :)


The way you have configure this s3 upload you are going to pay double data transfer costs. Once to the server and again uploading to s3.
Usually standard practice is to use signed URLs and uploading directly to s3 that way.
That is a very good point. Thanks for mentioning it. I noticed that most of the content out there used signed URLs but there wasn’t a clear reason why. I considered them as well, but I try to build things to work even if JavaScript fails, and the signed URLs flow is much more complicated. Requires submitting a form to get the URL, then uploading the file, then submitting another form to notify the backend.
I should add a note to the article about both approaches and their tradeoffs.